Developing a Game Engine
Welcome to my game engine blog. This is a project I started recently to learn more about game development and engine architecture and I will use this page to document my progress.
Stay tuned to follow me figure out various subsystems like rendering, physics, AI, and more.
Managing Scope
03.11.2025
Since the last entry, things have changed quite a bit around the engine. Before I even managed to make a post about the current rendering system with DirectX11 it has been replaced.
But it served its purpose: Giving me a relatively quick view into 3D rendering with C++. It was still a step-up from programming in C# for Unity or JS for this website but in the
world of graphics APIs, it was pretty straight forward.
But when I told a friend of mine of this project and she said: "DirectX11? Isn't that kinda old?" I realized she's right. I want to learn what the industry uses after all. And it turns out
that the companies I admire have moved on to lower-level APIs like DX12 or Vulkan to optimize even the smallest detail in their renderer. That's when I decided to get into Vulkan. I've looked
it up before, maybe even watched a tutorial but I never pulled through. So I took this project as the opportunity to finally do so.
My first plan was to abstract my current renderer to allow multiple APIs to be used. I started doing that for the DX11 side with no issues. Buffer classes, Shader classes, everything becomes
a generic version of itself. But when I arrived at Vulkan I realized that I have no clue how it works. I didn't know how and where the buffers are passed to the shaders, how to initialize a
pipeline (something which DX11 doesn't even need), what descriptor sets are, and thus I didn't know how I would abstract it to fit my generic renderer. It wasn't for a lack of trying; I spent
several weeks incrementally replacing parts of the hundreds of lines of code needed to render a triangle with functions that take a generic object instead of a Vulkan-specific one. But the
further I went, the more it became clear that this is not what I want to be doing. I wanted to do rendering, understand Vulkan, create cool effects but I was stuck wading through Vulkan
functions I didn't understand.
So finally I pulled out the ol' reliable and started again from scratch, a move that is guaranteed to spark motivation and drive. New repository, new me. This time, I would be starting with Vulkan,
paying my due dilligence and learning it from the ground up. I reused the project structure, Cmake scripts and most of the Win32 code but the scope would be entirely on one renderer.
So since mid-september I have been at work getting the new Vulkan project to where I was before. And at the point of writing this, I'm pretty much there (or even past it). I can render arbitrary GLTF
models, show Imgui windows, process input (which I use to move the camera), and even use lighting. But the best part is, that it already has the structure that I need to do highly performant rendering
down the road where I'm not just passing in hardcoded coordinates of a cube but complete scenes with lights, meshes and textures.
I'm really happy that I made the switch because I can now focus on what I really want to do and learn. I can really recommend taking things one at a time, especially with something as complex as Vulkan.
This allowed me to learn each part individually to then put them together in the end. I will write some more posts in the future to go over the new rendering architecture (the window creation is still the same)
and input handler.
Version Control with Git
12.05.2025I always use Git when I'm working on a project. It's invaluable for staying on top of what changed when and why. On thing I noticed when I started using Git was how my code base became much cleaner because I could suddenly just delete things at a whim instead of commenting them out in case I need them again later. If it turns out that I do need them, I'll just check the changes in Git and copy them from there. There have been a couple of times in this project where I started working on something and wondering: "Hang on, how did I do this before?". With Git I can then just check out the commit where everything worked and use my IDE to the fullest instead of picking around individual commits trying to find definitions by hand.
My tools
I use GitKraken as a Git client. There is certainly a benefit of using a CLI, especially at first to learn how everything works. But I've done that and having a GUI with all changes,
branches, remotes, commits and much more at a single glance I've been able to speed up my workflow by a lot. Now and then, when I can't find a specific command in GitKraken or it's not
specific enough I go back to the (integrated) terminal but for the most part I don't need that. The only thing that is extremely annoying with GitKraken is how it stashes things
automatically every time you tell it to pull, switch branches, checkout a commit, etc. I get that this way the action can be performed despite having uncommited changes on the working branch,
but most of the time I would prefer if it just gave me an error so I can decide how I want to handle this myself.
For my remote I just push everything to GitHub. It has a good integration with GitKraken and pretty much just works. I had no complaints about it in all the years I've used it.
Structure
I started this project with just a single monolithic branch where everything goes down. Rewriting the entire engine to make it API-agnostic? - Master Branch. Reorganizing file Structure with 50+ changed files? - Master branch. Implementing an entirely new feature? - You guessed it, master branch. This works of course, there are no merge conflicts so that's nice. But after the 10th time of telling someone who asks about my progress that I had this cool feature but I can't show them right now because I'm rewriting it and I have about 200 compiler errors to get through before the program will even run again, I decided that it's time for a second branch. Introducing: The dev branch. From now on, I will develop all my changes on this branch and as soon as they're ready, i.e., produce a working application, I will fast-forward the master branch to include the changes. This way, whenever I want to just showcase the current state I can simply switch to the master branch and run the latest stable version on master without having to comment out every red squiggly line on dev to make it kinda run.
Setting up the first window
09.05.2025
This post will deal with creating the first window. It's a great moment because it's the first time you actually get to see your creation.
Like any good setup functionality, this happens in an Init function, specifically that of GfxDevice. This class
combines Win32 stuff with DirectX stuff, though the implementations are split into their respective files. Init is defined in the D3D11 part
but checks at the very start, if a window has been created. If not, it calls CreateDeviceWindow() which is where the Win32-API comes into play.
CreateDeviceWindow goes through the usual window creation steps like creating a window class where icon, window procedure (more about that later) and other
things are set. After that we calculate the window rectangle based on the client size we want using AdjustWindowRect. With the window rect and the window class, we can
now actually create a window. We pass in the title, the style (i.e. what kind of window we want (with or without border, title bar, border, etc.)) and then that's basically it.
All that is left to do is call ShowWindow, passing in the result of our efforts and the window will appear. This is also where we initialize the Win32 part of Imgui.
The remaining part to talk about is the Window Procedure. This is a function that we pass to our window which defines how we want to react to certain Windows messages that are sent
to our window. The signature has the format LRESULT HandleMsg(HWND hWnd, UINT msg, WPARAM wParam, LPARAM lParam) where hWnd is the handle to the window,
msg is the message code sent by Windows, and wParam and lParam carry values that are relevant to the message (like the position of the cursor for a mouse move message).
LRESULT is just a typedef for LONG_PTR and it's used to return things to Windows. You can use it to chain multiple procedures together which is useful for
calling the default procedure after you have handled all messages that are relevant for you. This makes sure that all the standard stuff like moving and resizing your window is handled correctly.
But what you can also do is split your message handling into multiple parts where every subsystem defines their own procedure and picks out the messages they need. In Sirius, the main
procedure that is passed to the window just handles WM_CLOSE i.e., the user indicating that they want to close the window. It calls PostQuitMessage(EXIT_SUCCESS)
which puts WM_QUIT in the message loop which is picked up by our message dispatch in App which then initiates the shutdown of the app. But if it doesn't pick up
WM_CLOSE it just returns the next window procedure which is the one for the input. Or rather, it returns whichever procedure is stored in LRESULT (__stdcall * g_WindowProc)(HWND hWnd, UINT Msg, WPARAM wParam, LPARAM lParam)
This allows Input to define its own procedure and store it in g_WindowProc and it will be called.
The input window proc is just what you expect. Whenever an input event comes in (like WM_LBUTTONDOWN or WM_KEYDOWN) it sets the appropriate variable in the respective input class.
This allows other parts of the engine to query the input classes to find out if a button is pressed or not, where the mouse is on the screen, if it's in the window, etc. I'm planning on creating
a control manager which abstracts the physical device from the keybindings in the game so that the game developer can just bind certain actions to certain generic inputs. This way, the
programmer doesn't have to distinguish between pressing the A button on an Xbox controller and the X button on a PlayStation controller for jumping. They just specify
that whenever the player presses the south button on their controller, they jump. The device class handles all the different devices under the hood but in the end, the higher level systems
will just query IsButtonPressed("Gamepad South").
The input system will be covered in a future post.
To learn more about Window Procedurs in Win32, check out the official documentation.
Getting Started
30.04.2025
This was probably the hardest step of them all and I'm still not quite done with it. Whenever I start a new project, I tend to get hung up on "doing it right" from the beginning so that
I don't have to change it later but it results in not making much progress. Since architecture is such a central part though, I allowed myself some more time to gather information.
I started following a DirectX tutorial by ChiliTomatoNoodle (yes, that's the name) and it got me started initially on DirectX but it wasn't good for architecture. Another resource I can
recommend is the classic book "Game Engine Architecture" by Jason Gregory. It gives great insights on a lot of aspects of an engine but again, it was hard to develop an idea for how
everything works together.
What really had the biggest impact for me was getting my hands on the source code of an actual successful engine, written in C++ and with DirectX. I spent days on end combing through
the code, peeling back the abstraction layers, finding out where the damn thing's entry point even was. But once I got used to it, I used it constantly to check their way of doing it.
The first big question mark I had was when I found that the reference engine used almost exclusively static functions and global variables in all the startup parts of the engine. Here I was
after years of university where object-oriented programming was the center of the universe looking at code, that was (almost) entirely without it. I checked the book again and it actually
recommended that exact approach so that's what I went with.
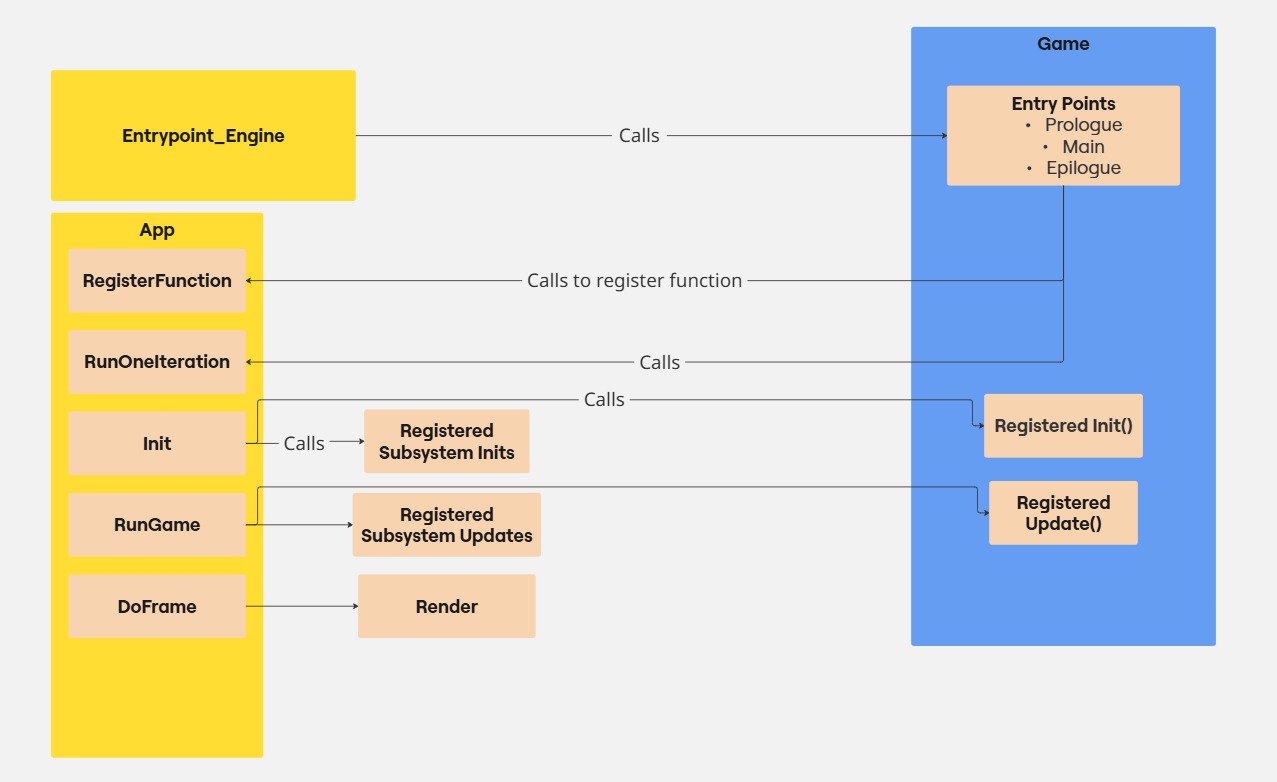
So this is the architecture as of now:
There's a chart at the bottom
There is the main function where the program enters. It lives inside the engine and all it does is call an entry point function that the game has set. This involves quite a nifty trick
where the game defines a static struct instance somewhere which sets function pointers to it's entry points. The engine then calls whatever is in those pointers. Since static variables
are initialized before the main function, the entry points are set before the engine starts up. This allows the game to define a prologue function which is run before everything else,
the main function which is run continuously in a loop and an epilogue function which is run after the game or engine has signaled to shutdown.
And so we have a way of starting the engine while keeping the game separated yet still in control.
The game then creates an instance of App which is responsible for the lifecycle of the engine. The idea is to implement a finite state machine later on to manage the state
that the engine is in but for now, calling App::RunOneIteration() just checks a isInitialized flag and decides based on that whether to run Init
or RunGame(). But before that, the game can make use of it's prologue entry point to register init and update functions that it wants called once at startup or once a loop
respectively.
In the main game loop, the game calls App::RunOneIteration() which enters its first "state", the Init state. It calls the respective init functions of all subsystems in the
correct order before calling each of the init functions that were registered in the prologue. I will go into more detail regarding the initialization of the specific subsystems like the
Win32 and DirectX setup in a later post. So, we return from App::RunOneIteration(), the engine's checks if the return value signals a shutdown and if not, runs the same thing again. This time though, the App enters into RunGame(). This is where messages from Windows are intercepted, checked for
WM_QUIT, which indicates a request to terminate the application, and dispatched for further processing down the road like user input and such. After that, all the registered
update functions are called before, finally, the frame is rendered.
And that's basically it
We have set up everything, we let it run until something asks for quitting at which point App runs it's final function App::Shutdown() and returns back to the
engine entry point, which terminates the app. Easy, right?
Below is a chart that I made to break down what's happening. The yellow boxes on the left are on the engine side, the blue one is the game side. The light orange ones are functions.